Building an Azure lab environment via ARM templates - Part2 Adding a VM to your network

Aim
This post will show you how to take your existing template and add a VM to it, slowly building up our lab environment.
Pre-reqs
You’ll need:
- Read/do Part 1 (https://www.chrisneale.org/Azure-Lab-via-Templates-Part1/)
The Story so far and next
We had an ARM template that would deploy a single vNet with a single subnet with fixed names.
Now we’ll add a VM…..but first we need to add one more thing a NIC
Here is the updated template with a NIC added. There are two variables to create a pointer to the subnet reference and one resource, all values are static (not variables or parameters for now)
{
    "$schema": "https://schema.management.azure.com/schemas/2015-01-01/deploymentTemplate.json#",
    "contentVersion": "1.0.0.0",
    "parameters": {},
    "variables": {
        "DC01VnetID": "[resourceId('Microsoft.Network/virtualNetworks', 'mylab-vnet')]",
        "DC01SubnetRef": "[concat(variables('DC01VnetID'), '/subnets/', variables('mylab-vnetSubnet1Name'))]",
        "MyLab-vNetPrefix": "10.0.0.0/16",
        "MyLab-vNetSubnet1Name": "Subnet-1",
        "MyLab-vNetSubnet1Prefix": "10.0.0.0/24",
        "MyLab-vNetSubnet2Name": "Subnet-2",
        "MyLab-vNetSubnet2Prefix": "10.0.1.0/24"
    },
    "resources": [
        {
            "type": "Microsoft.Network/networkInterfaces",
            "name": "DC01-NIC",
            "apiVersion": "[providers('Microsoft.Network','networkInterfaces').apiVersions[0]]",
            "location": "[resourceGroup().location]",
            "tags": {
                "displayName": "DC01-NIC"
            },
            "properties": {
                "ipConfigurations": [
                    {
                        "name": "ipconfig1",
                        "properties": {
                            "privateIPAllocationMethod": "Dynamic",
                            "subnet": {
                                "id": "[variables('DC01SubnetRef')]"
                            }
                        }
                    }
                ]
            },
            "dependsOn": [
                "[concat('Microsoft.Network/virtualNetworks/', 'mylab-vnet')]"
            ]
        },
        {
            "type": "Microsoft.Network/virtualNetworks",
            "name": "MyLab-vNet",
            "apiVersion": "2015-06-15",
            "location": "[resourceGroup().location]",
            "tags": {
                "displayName": "MyLab-vNet"
            },
            "properties": {
                "addressSpace": {
                    "addressPrefixes": [
                        "[variables('MyLab-vNetPrefix')]"
                    ]
                },
                "subnets": [
                    {
                        "name": "[variables('MyLab-vNetSubnet1Name')]",
                        "properties": {
                            "addressPrefix": "[variables('MyLab-vNetSubnet1Prefix')]"
                        }
                    },
                    {
                        "name": "[variables('MyLab-vNetSubnet2Name')]",
                        "properties": {
                            "addressPrefix": "[variables('MyLab-vNetSubnet2Prefix')]"
                        }
                    }
                ]
            },
            "dependsOn": []
        }
    ]
}
Not the line inside each resource “dependsOn”
These allow you to specify dependencies. Here we want to attach our NIC to a vNet, so we specify that the NIC “depends on’ the vNet being there. So Azure waits for that resource to complete successfully before deploying the NIC.
Rather than keep doing a new Template Deployment and click save we’re going to add it to our “Template Library”
- So save the text in Notepad++ or similar and go to All Services/Templates
- Click Add, Give it a name like “myLab” and a description
- Click OK, then on the template page, paste in your new template which is a vnet+nic
- Click OK. Click Add. Your template library should now look like this
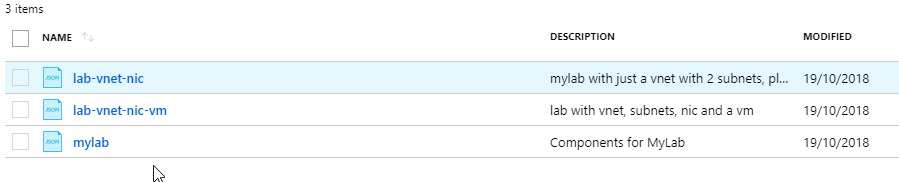
- Click your template and you’ll see you have the “Deploy” option now, SO CLICK IT!
- It asks you for Subsription and Resource group (and location but that is determined by the RG you select) IMPORTANT: Please select the Resource Group you already used for Part1 to deploy the vNet into*
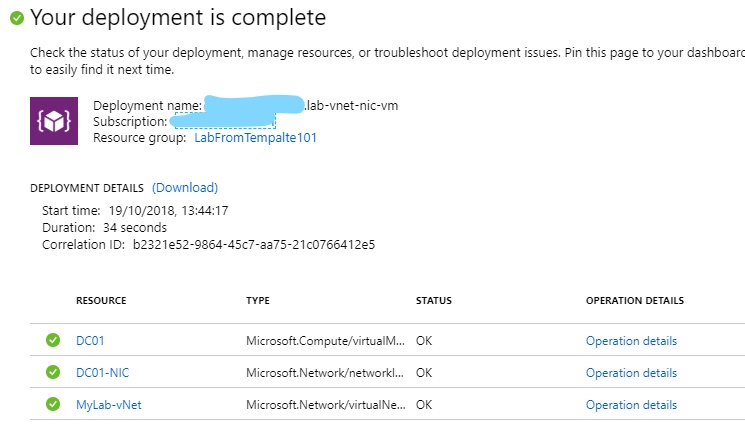
- Tick I Agree and Click Purchase. When it completes you can look at the deployment report and you’ll see it says it deployed a vnet and a NIC…that’s not quite true, but it’s really saying it found the vNet already there and correctly configured. ***ARM IS DECLARATIVE, remember. So you asked for a vnet and NIC. It made sure that was what was there when it had finished. If someone else has already done the work, ARM doesn’t care. :-)
Adding the VM to the template
Now we have a vnet and a NIC, we can add the resource for the VM.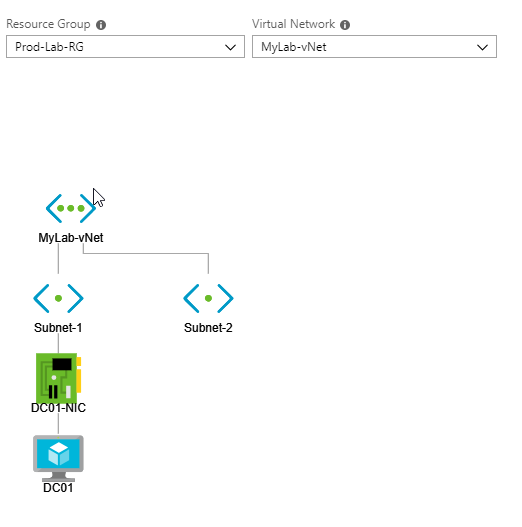
We’re going to add two parameters to the parameters section, as I don’t want to decide your admin username and password.
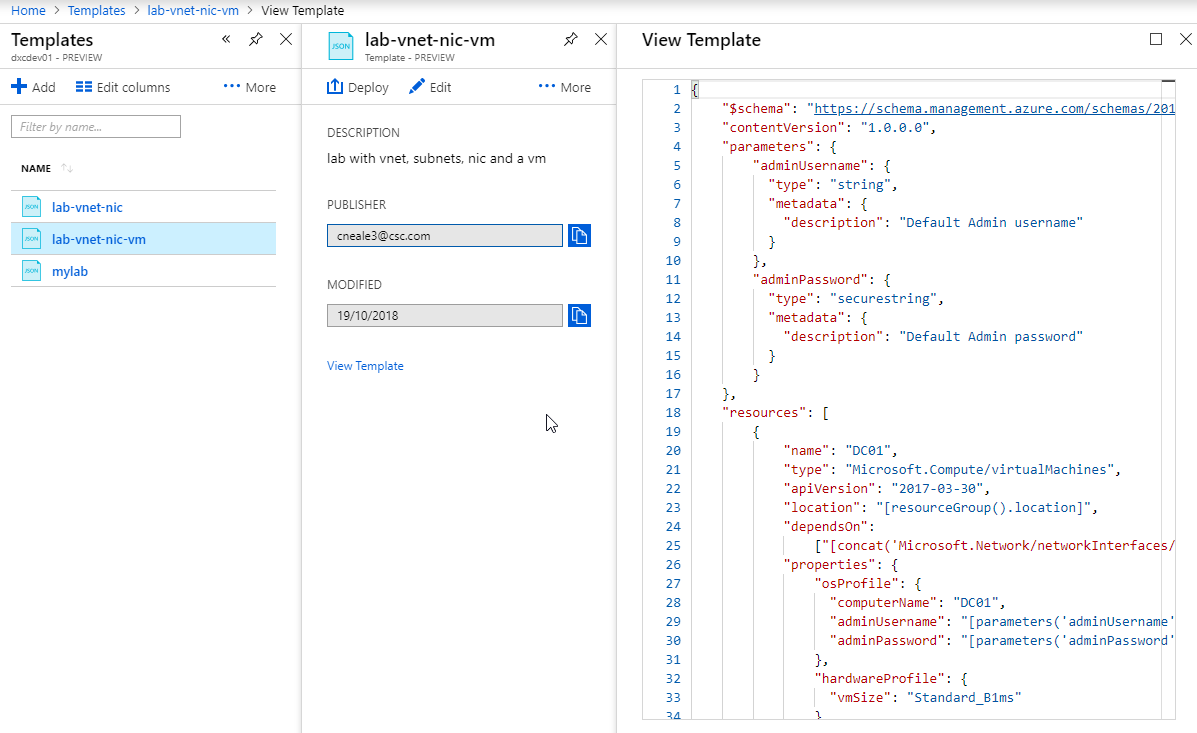
Here’s the updated template with 2 parameters, 3 resources and 7 variables
{
    "$schema": "https://schema.management.azure.com/schemas/2015-01-01/deploymentTemplate.json#",
    "contentVersion": "1.0.0.0",
    "parameters": {
		"adminUsername": {
		  "type": "string",
		  "metadata": {
			"description": "Default Admin username"
		  }
		},
		"adminPassword": {
		  "type": "securestring",
		  "metadata": {
			"description": "Default Admin password"
		  }
		}
	},
    "resources": [
        {
			"name": "DC01",
			"type": "Microsoft.Compute/virtualMachines",
			"apiVersion": "2017-03-30",
			"location": "[resourceGroup().location]",
			"dependsOn":
				["[concat('Microsoft.Network/networkInterfaces/', 'DC01-NIC')]"],
			"properties": {
				"osProfile": {
				  "computerName": "DC01",
				  "adminUsername": "[parameters('adminUsername')]",
				  "adminPassword": "[parameters('adminPassword')]"
				},
				"hardwareProfile": {
				  "vmSize": "Standard_B1ms"
				},
				"storageProfile": {
				  "imageReference": {
					"publisher": "MicrosoftWindowsServer",
					"offer": "WindowsServer",
					"sku": "2016-Datacenter",
					"version": "latest"
				  },
				  "osDisk": {
					"createOption": "FromImage"
				  },
				  "dataDisks": []
				},
				"networkProfile": {
					"networkInterfaces": [
						{"id": "[resourceId('Microsoft.Network/networkInterfaces','DC01-NIC')]"}
					]
				}
			}
        },
		{
            "name": "DC01-NIC",
            "type": "Microsoft.Network/networkInterfaces",
            "location": "[resourceGroup().location]",
            "apiVersion": "[providers('Microsoft.Network','networkInterfaces').apiVersions[0]]",
            "dependsOn": [
                "[concat('Microsoft.Network/virtualNetworks/', 'mylab-vnet')]"
            ],
            "tags": {
                "displayName": "DC01-NIC"
            },
            "properties": {
                "ipConfigurations": [
                    {
                        "name": "ipconfig1",
                        "properties": {
                            "privateIPAllocationMethod": "Dynamic",
                            "subnet": {
                                "id": "[variables('DC01SubnetRef')]"
                            }
                        }
                    }
                ]
            }
        },
		{
            "name": "MyLab-vNet",
            "type": "Microsoft.Network/virtualNetworks",
            "location": "[resourceGroup().location]",
            "apiVersion": "2015-06-15",
            "dependsOn": [],
            "tags": {
                "displayName": "MyLab-vNet"
            },
            "properties": {
                "addressSpace": {
                    "addressPrefixes": [
                        "[variables('MyLab-vNetPrefix')]"
                    ]
                },
                "subnets": [
                    {
                        "name": "[variables('MyLab-vNetSubnet1Name')]",
                        "properties": {
                            "addressPrefix": "[variables('MyLab-vNetSubnet1Prefix')]"
                        }
                    },
                    {
                        "name": "[variables('MyLab-vNetSubnet2Name')]",
                        "properties": {
                            "addressPrefix": "[variables('MyLab-vNetSubnet2Prefix')]"
                        }
                    }
                ]
            }
        }
    ],
    "variables": {
		"DC01VnetID": "[resourceId('Microsoft.Network/virtualNetworks', 'mylab-vnet')]",
        "DC01SubnetRef": "[concat(variables('DC01VnetID'), '/subnets/', variables('mylab-vnetSubnet1Name'))]",
        "MyLab-vNetPrefix": "10.0.0.0/16",
        "MyLab-vNetSubnet1Name": "Subnet-1",
        "MyLab-vNetSubnet1Prefix": "10.0.0.0/24",
        "MyLab-vNetSubnet2Name": "Subnet-2",
        "MyLab-vNetSubnet2Prefix": "10.0.1.0/24"
    }
}
So around 35 lines to define the VM. It dependsOn the NIC, so it waits for that before it gets deployed, it uses the parameters you give it for username and password and points to the NIC for it’s network profile. Everything else is hard coded. Depending on your template that might be good or maybe you want everything named with a prefix or suffix you have, you can do that with parameters and variables which we’ll see in another part.
- Go to your dashboard or All Services, if you don’t have it pinned, and choose Templates
- Click on your template and click edit
- Click on “ARM Template” and paste in our new template
- Click Save then click Deploy
- Pick your existing resource group and specify a username and password, tick the agree box and tick Purchase
About 5-10 minutes later you’ll have a VM with a NIC on a vnet.
Now you can delete your Resource Group whenever you want and redeploy in 5-10 minutes just picking a RG and entering username and password.
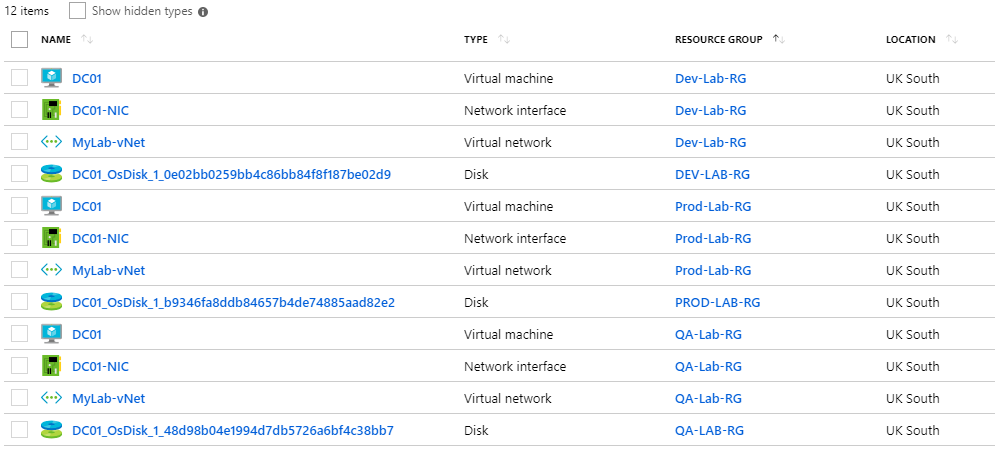
If you deploy it to the same resource group again. It only takes about 34 seconds, because all those resources already exist! Pick a new RG and you’re back to 10 minutes. Ahh but you could have 3 Resource Groups, PROD-RG, QA-RG, TEST-RG and deploy the same Lab into each RG and you know it’s identical.
Powershell Time
- Login to your azure account using Connect-AzureRMAccount
- Create 3 new Resource Groupsusing New-AzureRMResourceGroup Prod-Lab-RG
Repeat for QA and Dev - Now deploy your lab 3 times. Save your template as a JSON file on your PC, then change to that folder in powershell, then run
New-AzureRmResourceGroupDeployment -Name ProdLabDeployment -ResourceGroupName Prod-Lab-RG -TemplateFile .\labtemplate.json -adminUsername MyAdmin
You will be prompted to enter the password, there are ways to pass that in, but it doesn’t let you type it in clear text on the command line. 4. Repeat for Dev and QA
5. Now check the Portal, go to All resource and filter on just those three RGs. Here’s a screenshot from mine mid-way through the QA deployment, grouped by ResourceGroup.
4. Repeat for Dev and QA
5. Now check the Portal, go to All resource and filter on just those three RGs. Here’s a screenshot from mine mid-way through the QA deployment, grouped by ResourceGroup.